Getting to know the MEAN stack with a LaTex Web Application
Some time ago I had the idea for a web application related to another popular project. I quickly realized that my knowledge about web application architectures and designs was quite archaic. To learn the basics of modern web application programming I decided to implement an online assistant for writing letters based on the word-processor LaTex. It can be found at www.texwriting.com. This article gives an overview about this application and provides the essential resources that I used during the development.
TL;DR
I got to know the MEAN stack, an open-source JavaScript software stack for developing web applications. The web application provides an assistant for creating nicely typed letters based on the typesetting system LaTex. You can find the web application at www.texwriting.com. This article provides information about the motivation, details to the used components, and links to resources that came in handy during the development.
Introduction
Some time ago I had the idea for a web application with some user interactivity, some database interaction, responsive user-interface, and server-side computations. When I finally took my time and started to work on that I quickly realized that my old-school knowledge about HTML, some CSS, PHP and MySQL were light-years behind current web application concepts and standards. I decided to take my time and dig deeper into this and to create a website that offers an assistant for writing letters, which makes use of the typesetting system LaTex to generate nicely typed PDFs.
After a lot of reading, try-and-error, and concentrated coding the letter application that can be found at www.texwriting.com got all the functionality that I had in mind in the end. You can find all sources of this web application at https://github.com/petrockblog/texwriting. This article gives an overview about the application itself as well as about the resources that I used during the work on it.
A Web Application for Writing Letters Based on LaTex
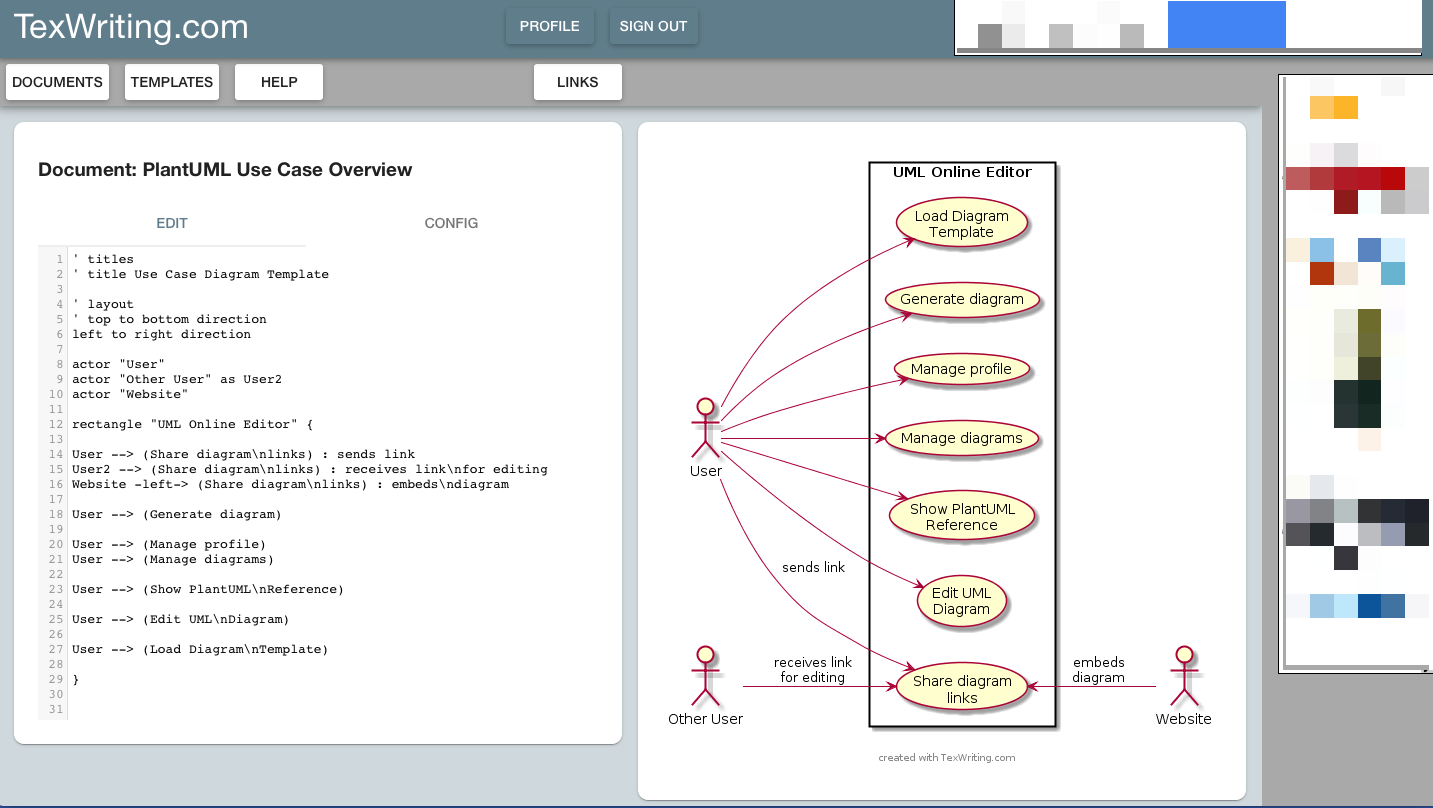
So, what is the web application supposed to do? I wanted to implement something that would make use of concepts that I would also need in other web application. Here is a list of use cases of our UML assistant:
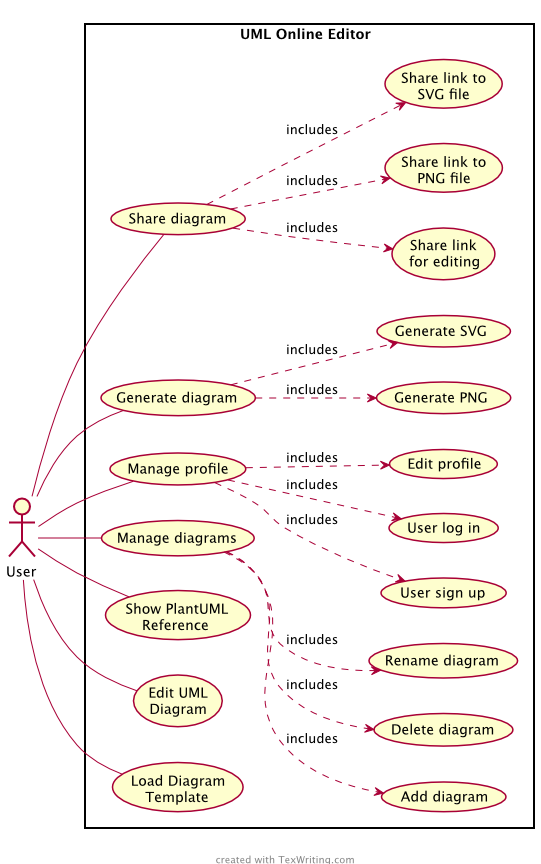
Well, quite some things to do:
- The user should be able to edit the content of the different letter areas. Only form fields should be filled and the user should not be confronted with any LaTex-specific syntax.
- The user should be able to generate a document out of the provided letter content. Generating the document out of the letter information should be very simple, in the best case the document should be generated automatically. All data that is sent to and received from the server should be encrypted. The user should have a possibility to save the data on his local machine. Also, the number of generated documents should be counted in a database.
- The user should be able to save the letter as PDF as well as JSON object.
- The user should be able to load the information of a letter into the application. In this way the user is able to re-use previously written letter data.
- The user should be able to provide feedback. The feedback should be displayed on the website and provide discussion threads.
- The web application should show advertisements so that hosting costs could be compensated.
This project was intended to let me learn the basic concepts of modern web application. Looking back, I feel that one major thing that is missing here is some sort of user authentication. I simply did not take my time for that yet.
The Development Environment
To get things going I started to develop on my local machine. Basically, you can start developing with the MEAN stack components if you have your favorite text editor and an open command shell. I used my favorite editor Sublime Text together with the MacOS terminal. You can find quite a lot of helpful plugins for Sublime Text that support web application development, just search the package directory, e.g., for JSFormat, JSHint, JavaScriptNext, or Angular, and you will get an efficient development environment in minutes. Of course, there are loads of specialized integrated development environments (IDEs) for JavaScript projects. JetBrains Webstorm is one of those IDEs that tried out and I must say that I got a good impression of that tool. However, I wanted to keep the costs as low as possible for this project and, in the end, I preferred the slim and much cheaper combination of Sublime Text and the terminal.
Also, CodePen.io often turned out to be a valuable source of information with online functionalities: It allows you to experiment with code snippets directly on their website without further delay. An early example of an Angular front-end that I looked at was this one.
Rapid Development with a Framework: The MEAN Stack
After I set up the list of use cases that the web application must fulfill I started to try and get an overview about present frameworks for web application development. There is a myriad of web frameworks. In the end I decided to use the frameworks, which the MEAN stack comprises:
- “M”, for MongoDB, a NoSQL database,
- “E”, for Express.js, a web application framework,
- “A”, for Angular.js, a JavaScript model-view-controller framework for web applications,
- “N”, for Node.js, a cross-platform runtime environment for server-side web applications.
From a deployment point-of-view you can image the MEAN stack in this way:
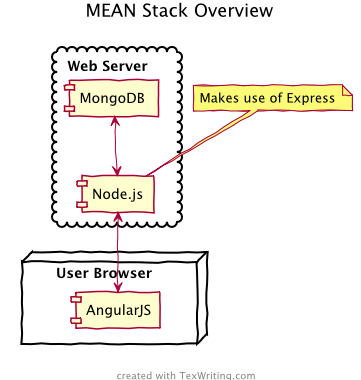
Node.js provides the core server functionalities, takes care for the HTTP and HTTPS connections, and handles all the server-side computations. Express makes makes the web server part even easier. MongoDB is used for statistic counters in this application, which is far beyond the capabilities of MongoDB, I know. But it was a nice application for learning MongoDB together with Node.js. AngularJS runs on the user’s local machine and takes care for the front-end logic.
What I particularly like about the MEAN stack is the fact that you can use the same programming language, JavaScript, throughout your whole project. Valeri Karpov from MongoDB tells it in this way and I fully agree with it:
[…] we can store our documents in a JSON-like format, write JSON queries on our ExpressJS and NodeJS based server, and seamlessly pass JSON documents to our AngularJS frontend. Debugging and database administration become a lot easier when the objects stored in your database are essentially identical to the objects your client Javascript sees. Even better, somebody working on the client side can easily understand the server side code and database queries; using the same syntax and objects the whole way through frees you from having to consider multiple sets of language best practices and reduces the barrier to entry for understanding your codebase. […]
With the application and the decision for the MEAN stack in mind, how did I continue? Besides web resources, I got some books that helped me with that at the beginning:
- Node.js, MongoDB, and AngularJS Web Development
This book gives an insight into every component of the MEAN stack and provides a lot of examples that can directly be tested out. The book was a bit overwhelming in the first read, which might also come from the not so perfect layout, and I turned to additional resources. However, I began to look into that book again during the development after I become more and more familiar with the individual frameworks. Especially the section about “Practical Web Application Components” that gives complete examples (including all MEAN components) turned out to be very useful in my case. - Node.js Design Patterns
As the book states in the introductory part, it is intended for developers that have already had first contact with node and finished some smaller Node.js projects. This books helps you to further improve your code and gives you hints and tweaks for various aspects of Node.js. For a beginner I must say that this book is not the first choice for getting to know the MEAN stack. But if you turn to that book with special questions that arise during the Node.js development it is a helpful resource.
Here is an exemplary overview about the interaction between the different components when the user generates a new letter document: When the user clicks the ‘generate’ button or changes one of the input fields, the PDF of the letter is updated. This is process is shown in the following diagram:
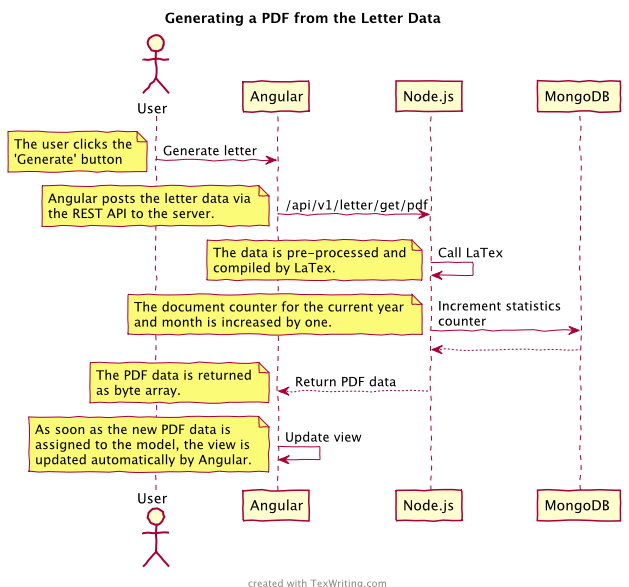
The following sections give some more details about the resources that I used when I dealt with the different MEAN stack components for this project.
Node.js as Server-Side Runtime Environment
As I mentioned above, in the first phase I developed solely on my local machine. Therefore, I only had to install Node.js, which is easily done with the installer available on the Node.js download site. If you later want to set up a Node.js web application server, DigitalOcean provides a well-written tutorial about this. Also for the deployment on the web application server, I found the other tutorial form DigitalOcean about PM2 helpful. At this point I also would like to mention Node’s package manager NPM that I have used a lot and that made me more than one time say ‘wow, so easy’ during the work on this project. It is fascinating to see how many packages for all kinds of applications exists for Node.js.
A Web Application in Seconds: The Express Framework
Node.js already comes with modules that provide a basic framework to implement HTTP and HTTPS servers easily. While these modules are quite low level, there is the Express module that
[…] extends the functionality of the http module by making it easy […] to handle server routes, responses, cookies, and HTTP request statuses. (from: Node.js, MongoDB, and AngularJS Web Development)
Setting up an HTTP and HTTPS server with Node, Express, and MongoDB connection with authentication took me around 30 lines of code and I bet that this could even be smaller with a bit more knowledge about Node. To get an SSL certificate for the server, I used the service offered by StartSSL. I made good experiences with that service and I got my certificate within minutes.
Express made it very easy to create a REST API. Basically, the definition of the routes looks like
[code lang=javascript] app.get(/api/v1/letter/get/pdfcounter,letters.getCounterPDF); (1)app.post(/api/v1/letter/get/pdf,letters.getPDF); (2)
[/code]
Here, line (1) defines a route for getting a counter that returns the total number of PDFs generated with the letter service. The function ‘getCounterPDF’ accesses the MongoDB for this. Line (2) defines a route that allows to post letter JSON data and returns a PDF as result of the LaTex compiler.
Managing Data with MongoDB
The database plays only a minor role for this web application, because the application is not supposed to save any letter information. For learning purposes it is used to collect some usage statistics: It counts the number of generated documents per month and year.
To get things running with MongoDB I have followed these steps:
- Installation of MongoDB
You can find many examples and tutorial about the installation of MongoDB in the web. I followed this one for the first installation, basic configuration, and getting to know some rudimentary steps. - Installation of a (remote) MongoDB administration client
MongoDB provides a command shell that gives you the abilities to fully administrate it. If you are looking for a graphical user interface for that task, you — again — have the choice between a plethora of tools. Among those, I found that MongoChef provides exactly those functionalities that I was looking for: Remote connections to a MongoDB installation, queries, and administration with a well organized GUI. For technical questions StackOverflow helped me with details about the MongoDB configuration for remote connections to MongoDB databases. - Installation of the Node.js MongoDB driver
In order to access a MongoDB database from within Node.js you need to install a driver. This is done with a single command by using the Node Package Manager (NPM). - Installation and Usage of Mongoose
Mongoose provides elegant MongoDB object modeling and allows you, e.g., to generate and work with model schema definitions, data models and their operations, as well as data validation. Like a facade you can imagine Mongoose to be an additional layer between MongoDB and your application that eases the usage of MongoDB databases. The installation and basic usage of Mongoose went quite well, except one thing: I realized that not all versions of Node.js, MongoDB, and the Node.js driver for MongoDB are compatible with each other. If you are running into these problems and you happen to follow some online tutorial, it is best to install exactly those versions that are mentioned in the tutorial then.
At this point of the development I found the various tutorials from Simon Holmes very helpful. They are not only about MongoDB, but about the MEAN stack in general and I can recommend to read them.
Where is the Front-End? Angular.js and Angular Material
So, Node.js together with Express and MongoDB are working on the back-end side of the application. What about the front-end? Here, we make use of AngularJS, a framework that allows you to use HTML templates to describe the views of your application. Angular synchronizes the data of the views with your Javascript models through two-way binding. Controllers, Factories, Services, and Dependency Injection are further core components of AngularJS, which are supposed to support the developer to structure the application and make it easy to maintain and test. I discovered the AngularJS tutorial site quite recently and got the impression that it might also be a good starting point for getting to know AngularJS.
When I started with the front-end development I quickly realized that I would need some sort of user-interface library so that I would not need to define the look-and-feel of the views from scratch. I looked especially for something that was fitted to AngularJS and I found Angular Material. Angular Material is an implementation of Google’s Material Design Specification and plays nicely together with AngularJS. The Demos Section of the Angular Material website turned out to be very helpful. Another helpful resource was the book “Unraveling Angular Material“. Besides other things the book helped me to get ideas about how to organize the files for the front-end.
Icons became another issue — where should I get them from? A quick web search did it and I found the great website Font Awesome that offers free icons of all possible kinds.
Another great thing about Angular is its huge community. You can find components for all kinds of things; Google and Github are your friend here. Here is a list of components that I am currently using for this LaTex application:
- AngularJS PDF
An AngularJS directive to display PDF files with the help of the Javascript library PDFJS. - Angular Disqus
A directive to embed a Disqus comments widget on your AngularJS page. - ngAdsense
An AngularJS directive to display Google AdSense advertisements. - Angular Google Analytics
This service lets you integrate google analytics tracker in your AngularJS applications.
I think that good user-interface design is a complex task. I am no expert in UI design, but I at least wanted to try and come up with something that would be a good basic UI without big annoyances. After creating a basic idea of the UI for the application, I spent hours to learn the basics of Angular and Angular Material. Then I started to think about refinements for the initial drafts of the user interface. I made quite a progress regarding its usability. During that process I got to know the developer tools and especially the debuggers of Safari and Chrome quite well. Even though there are a few things that I still would like to enhance, I reached the point were I decided to keep the UI in its current state (at least for now).
Overall, I can enjoy the work with Angular and Angular Material. As soon as you have mastered the basic concepts and ideas of these libraries it is very easy to come up with a modern looking UI for your front-end.
Some Screenshots of the Final Web Site
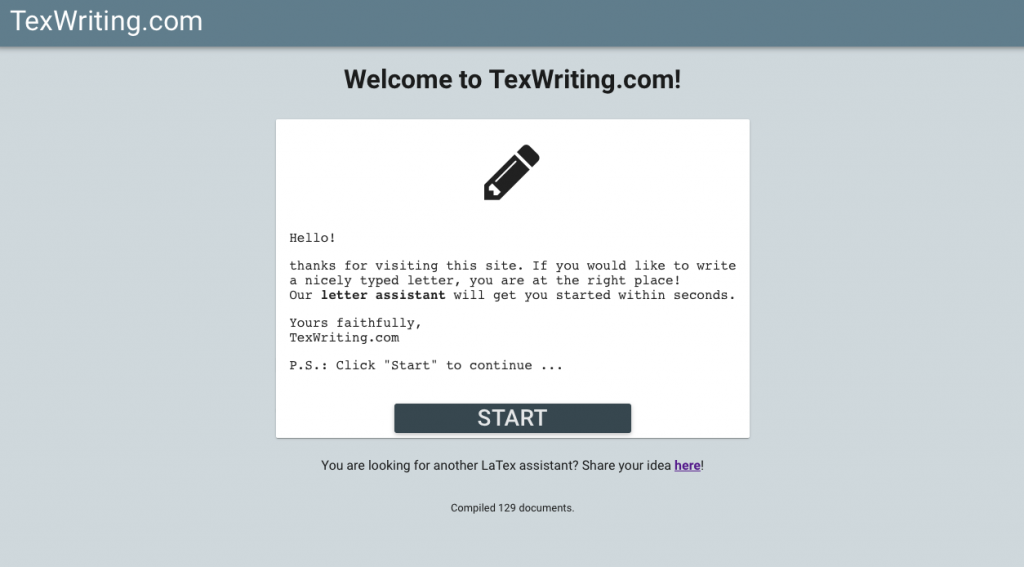
Here are some screenshots of the site to give you an idea about the look:
Conclusion
With this project I learned the basics of web applications based on the MEAN stack. The presented application provides an assistant for letter writing and makes use of the LaTex word processor on the server site. It can be found at www.texwriting.com. In this article I presented the main use cases of that application and I gave you an overview about the different components of that system together with the various resources that I used to realize everything.
Working with a single programming language on all components of the system was something that I had not experienced in other projects so far. I enjoyed it! The concept of the MEAN stack worked well for this application. For sure, I am still a beginner when it comes to all the used frameworks, but at the same time I am already feeling able to start with other web application projects and to realize new ideas!
What did I left out so far? User authentication is one thing. Satellizer seems to be an interesting option to get this done. Also, I did not take a deeper look at creating unit tests for the Angular components or for the Node.js components of the system.
By the way: If you wonder were the UML diagrams in this article come from, I can tell you that I liked to work with the MEAN stack so much that I decided to start another small project: An UML assistant that allows you to create and share UML diagrams based on PlantUML. But I will write about this in the next post …
I hope you enjoyed this article, learned or found something in it. Feel free to use the comments below to give feedback or ask questions!


I’m getting into the MEAN stack as well, and have been trying to get more people hooked on it. I have become an evangelist for Angular among my coworkers, most of whom are still creating sites with ASP Web Forms and very minimal (if any) CSS. Regarding texwriting.com, you may want to concatenate and minify your Angular files. I can see all of your code, which means I can look for ways to exploit it. Minification will obfuscate your variable and function names, making it very difficult for others to read your live code.
You can concatenate and minify your files (and do a lot of neat things) with task systems like Gulp and Grunt. Gulp is more code-based, while Grunt is config-based. I prefer Gulp, but they both work well, and can be installed using NPM.
Also, I would recommend moving your data processing logic into services or factories. The rule of thumb is: controllers for business logic and view manipulation, providers (services and factories) for data access and logic. It will help when you need to use the same calls for different controllers, just inject the service and your’e good to go. For more robust RESTful services, you can use ngResource or RESTangular.
The leading resource for Angular best practices is John Papa’s Angular Style Guide ( https://github.com/johnpapa/angular-styleguide ), Learn it. Love it (at least until Angular2 is released). Especially pay attention to the section on dependency injection if you choose to minify your JS files.
Other great Angular stuff to discover: Angular-UI, Angular-nvD3, and a lot of cool stuff at ngmodules.org.
As far as editors go, I use Brackets and more recently VSCode. Because of their plugins and extensions, both can become more like an IDE than just a text editor, and are great with Node applications. Just check them out. They’re both free.
That is great information, thanks!